Easy DIY Door Silencer Tutorial
Don't let the door slam and wake your sleeping baby! This easy DIY Door Silencer is the solution for the noise of a slamming door. It makes a great homemade baby shower gift too.
Servings: 1
Equipment
- Pair of Scissors (or Rotary Cutter and Mat)
- Iron and Ironing Board
- Ruler
- Straight Pins
- Needle
Ingredients
- 1/4 yard fabric
- fat quarter of either batting or fleece
- thread
Instructions
- Cut 2 6 inch x 6 inch squares out of your desired fabric. If using fleece; cut 1 6 inch x 6 inch square. If using batting; cut 2 6 inch x 6 inch squares.
- Cut 4 9 inch x 1 1/2 inch strips out of your desired fabric.
- With your iron hot, take your strips and fold both edges inward until they meet in the middle and press.
- Then fold in half and press again.
- Sew a straight line down the middle of each strip after being folded. Be sure to backstitch at the beginning and the end of each strip. This forms your ties for the door husher.
- Lay out your fabric, batting (or fleece) and ties in this order:*batting (or fleece)*1 fabric square with the design facing up*your ties, 2 on top of each other on opposite ends and facing inward. (I ended up tying mine in a loose knot to ensure that I didn’t end up sewing over these along the perimeter). Pin these about 3/4 inch inward to ensure proper placement.*your last fabric square on top with the design facing down
- Pin about 3/4 inch inward all around the square.
- While pinning, when you come to the ties, be sure to remove the pins that have been sandwiched and re-pin (in the same place) now with the fabric on top.
- Starting on either the top or the bottom (not the sides with the ties) start sewing with a 1/2 inch inseam, removing pins as you go.
- Be sure to do a few back-stitches when sewing over the ties, as this is the area that will get the most tension.
- Do not sew completely closed, leaving about 3 inches.
- Turn your door husher right side out.
- Where the opening is, use your iron and fold rough edges inward and press and pin.
- Then sew with a 1/4 inseam all around the outer edge of the door husher to give a finished look.
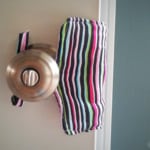
- Tie around the doorknob.
- No more slamming doors! and no more kids getting themselves locked in a room!